How to do a Breast Self-Exam (BSE)
A breast self-examination is an early detection tool which allows an individual to examine their breast tissue for physical and visual changes.
Breast Self-Exam Tips
- Everyone, including males, should perform a BSE at least once each month beginning at age 18.
- Do your BSE, five to seven days from the start of your monthly period.
- If you are pregnant, never had a period, no longer have periods or your period is irregular, choose a specific day each month to perform your self-check.
- This should not be performed in the shower or with lotion on your skin or fingers.
- If you find a lump or notice other unusual changes, don’t panic. About 80% of lumps found are not cancerous. However, you should see your doctor promptly for further evaluation.
Download A Print-Friendly Version of How to Do A Breast Self-Exam.
How to do a Breast Self-Exam Part 1: TOUCH
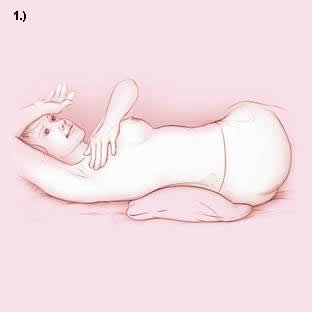
Check the OUTER HALF of your right breast. Lie down and roll on to your left side to examine your right breast. Place your right hand, palm up on your forehead. Your breast should lie as flat on your chest as possible. It may be easier and more comfortable if you put a pillow behind your shoulder or back.
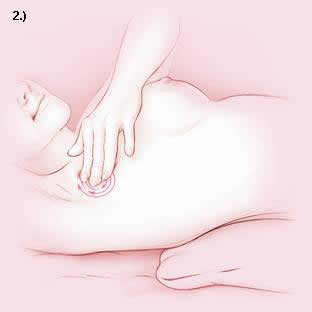
Using the flat pads of your three middle fingers—not the tips—move the pads of your fingers in little circles, about the size of a dime. For each little circle, change the amount of pressure so you can feel ALL levels of your breast tissue. Make each circle three times—once light, once medium, and once deep—before you move on to the next area.
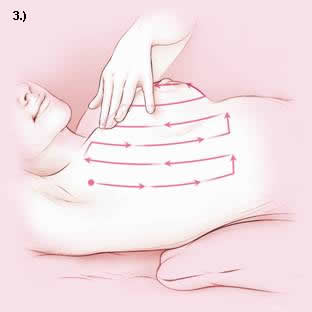
Start the circles in your armpit and move down to just below the bra line. Then slide your fingers over—just the width of one finger and move up again. Don’t lift your fingers from your breast as you move them to make sure you feel the entire area. Continue this up-and-down vertical strip pattern—from your collarbone to just below your bra line—until you reach the nipple.
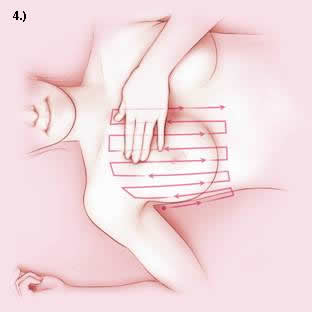
Check the INNER HALF of your right breast. When you reach the nipple, remove pillow and roll on to your back, remove your hand from your forehead and place this arm at a right angle (see drawing). Carefully check the nipple area using the same circular pressures as before, without squeezing. Then examine the remaining breast tissue using the up-and-down vertical strip pattern, until you reach the middle of your chest. Place your non-palpating hand down at your side, make a row of circles above and below your collarbone, working from your shoulder to your mid-line. Roll on to your right side and repeat these steps on your left breast, using your right hand.
How to do a Breast Self-Exam Part 2: LOOK
Stand in front of a mirror and look closely at your breasts in these three positions. All three of these poses need to be viewed from the right and left as well as facing forward.
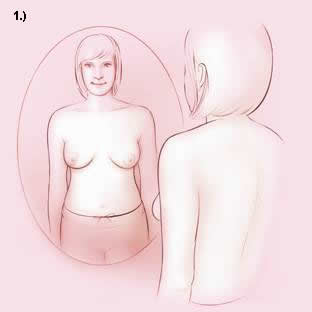
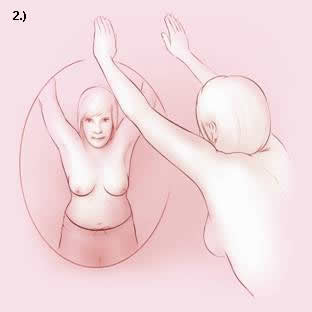
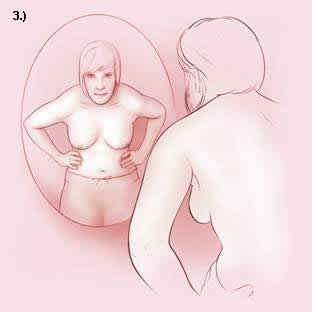
Check for changes in the following:
- Shape: Compare one to the other. One breast may normally be larger than the other, but sudden changes in size should not occur.
- Skin: Check for rash, redness, puckering, dimplingA depression or wrinkle of the skin that may be a visual sign of breast cancer., or orange-peel-textured appearance.
- Nipples: Check for any physical changes such as a sudden inversion, scaling, redness, itching, swelling, or discharge.
- Vein patterns: Look for a noticeable increase in size or number of veins compared to the other breast.
- Continuous itching: Itching which is not relieved by topical lotions or medications.
What’s Next?
Repeat this exam every month—even if you’re pregnant—to become more familiar with how your breasts normally look and feel. If you find a lump or notice other unusual changes: Don’t panic. About 80% of lumps found are not cancerous. See your doctor promptly for further evaluation.
© 2009-2023 Maurer Foundation for Breast Health Education
